Cari Blog Ini

Showing posts with label Blog Buddy. Show all posts

No Reply...We All Might Be One

Written By Unknown on Wednesday, May 23, 2012 | 7:05 AM


Hello all my wonderful friends. I know what you're thinking...please, not another "No Reply" post. Sorry, but it is. You know it's one of my blogging missions to free the world of "No Replies" Lol !!

Some of you who are new to blogging may be asking what is "No Reply". Well, here it is in a nut shell.
  • you leave a comment on someone's blog
  • that blogger has her comments sent to her email inbox
  • she reads your comment in her email
  • she clicks the reply button to reply back to you, but...
  • in the email address section it says the dreaded...No Reply-comment instead of your email address
  • no blogging connection made

Over the years, I have had several posts showing how to change your "No Reply" status, but what does Blogger do...change their interface and dashboard.

Recently, I have had so many bloggers email me saying they have NEVER been a "No Reply" before, but since switching to the new dashboard, they are now.

It doesn't seem to be everyone, but I wanted to send out a little friendly reminder to check your profile settings.

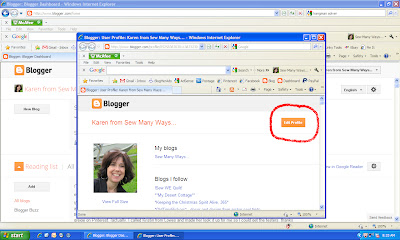
Here is a picture tutorial on how to check, because it's in a different place on the new dashboard. Click picture to enlarge.

Go to your dashboard. In the upper right hand corner is your blog name and your profile picture or blog icon. CLICK the DOWN ARROW.


A pop up window will appear. Click BLOGGER PROFILE.


A new pop up window will appear. In the upper right corner, click EDIT PROFILE.


Then the old Privacy section will show up.

You MUST have a check mark in the box that says "Show my email address". You MUST click SAVE at the bottom when you're done.

That's it...easy!


PART 2 of this post...

I wanted to mention the new Google Plus. It's Google social networking version of Facebook. However, people are leaving comments with this platform and most seem to be "No Reply"


I am not on Google +, so I have no idea how to change that setting. If you are using Google + to leave comments, you may want to look into your profile setting for your email address.

 and Part 3...

The comment section on blogger now has a Reply button under each comment that's been left. Here's how it works.
  • someone leaves a comment
  • another reader wants to comment to that "specific" comment and clicks the reply button
  • she leaves her comment and it is posted just under the first, indented just a little.
here's an example (below) of one if you haven't seen it before.

Correct me if I'm wrong, but I wanted to make sure everyone knew that the "reply" doesn't go to the person leaving the original comment. It's just posted there for future readers to see.

I've also seen this when the blog owner replies to the comment in that section. It's great when you leave the comment and it's there for all future readers to view, but I don't think it goes directly to the commentor herself.


The only way the commentor can see the replies is if she "subscribes" to that post. See that circled item in the picture below? If you click that, you are now subscribed to all the comments on THAT particular post and that post only.

Meaning, every comment that is left on that post will be sent to your email. Great if you want to read what everyone is chatting about on that particular topic.

When you click the SUBSCRIBE BY EMAIL button...


It will say..."follow-up comments will be sent to (then your blogger email address shows up)


If you don't want to follow that specific post any more, just go back and click UNSUBSCRIBE.


Hope this helps all bloggers new and old.

My next mission is to figure out the fix between Blogger and all the Typepad and Wordpress bloggers, because they always show up as No Reply.

The solution would be for Blogger to create a comment form like Typepad where you just put your email address and blog URL in to leave a comment. That way EVERYONE can leave a comment whether you have a blog or not and it would eliminate "no replies". The option to have an email address show up would be for the person to decide.

Blogger can you hear us? Can you please fix this comment issue?

Have a great day,
~Karen~

Pin It
7:05 AM | 0 comments | Read More

How To Make A Custom Blog Signature...No HTML Codes

Written By Unknown on Sunday, May 20, 2012 | 9:01 PM

Every once in a while we all want to tweak our blogs and add something new or pretty. What's my biggest criteria for adding something...Easy Peasy!!

I have always wanted to add a custom signature to my blog, but wasn't sure how to make one and also didn't want to fool around with HTML codes.

Here's my solution for a signature...add it as a PICTURE on each post. I know that can be a pain adding it each time, but I'm always adding pictures any way...so what's one more.


Here's a quick tutorial to make your own...

First you need a background (almost like a piece of paper to start out). I'm using a PC right now, so I'll be using Paint. I still haven't figured out how to do this on our iMac.

Just go to "Start" and paint is there for me.


If you need to look for it, go to
  • Start
  • All Programs
  • Accessories
  • then Paint


When Paint pops up, a white square or page should be there. If not, click...
  • "File" in the upper left corner
  • then "New"
A white "page" will be there. I'm using the white background, because my blog background is white and that will make my signature appear just as the signature.


You need to save what I call a "white piece of paper".

Click...
  • File
  • Save As
  • I named it White Background
  • then you MUST save it as a jpeg for it to open in a photo editor


Now go to your favorite photo editor. I love PicMonkey.


Upload your white background photo


I cropped mine to 125 x 50, but this is totally up to you. Experiment with what size you want your signature to be.


Now use the different fonts, colors and sizes.


You can also add fun little pictures too. They have flowers...


Push pins...and tons more like borders, picture corners etc


Here are some I experimented with color, size and add ons.


When you finish with your editing of the signature picture, save it again as a jpeg and then just add it to your post like a photo.

Easy to make and easy to change with the seasons and holidays too.

Have fun with it!!


Pin It
9:01 PM | 0 comments | Read More

Blog Buddy...Explaining Blogger's Post Editor

Written By Unknown on Monday, May 7, 2012 | 5:50 AM


When I learn something new, I want to share it with you. I know most of you will know a lot of this information, but there might be something new for you to learn too!!

Most all of Blogger users will be using the post editor in the picture below. We seem to stick to what we know and do all the time and never venture from the norm. Well, I am here to get you out of your comfort zone and step outside the box.

Usually I am saying "think" outside the box...now I'm saying "step" outside the box. Either way, don't "box" yourself in, in the creativity department. Ok, I'll stop saying box now! Lol

This is the post editor on Blogger...this is my interpretation of each feature. If someone knows more, please share in the comment section.

The one that was NEW to me is the one that looks like a broken piece of paper. If you scroll your mouse over each one, it gives you the name. It's called Jump Break. Yeah, that helped me. Lol What's a jump break? Now I know and shared below. Scared me for a while..if it looks "broken" or "ripped", I didn't want to touch it!


Features, from left-to-right: with a short explanation and "the look" of the item

  • Undo...this will "remove" the very last thing you did
  • Redo...this will "put back" the very last thing you did
  • Font Style...drop down menu for different Fonts. Just high light what you want to look different and pick the different style. (see the word different is changed)
  • Font Size...drop down menu for different sizes of your fonts.
  • Bold....high light and click to bold the print
  • Italic...high light and click to slant the word.
  • Underline...high light the word or words to underline
  • Strikethrough...high light to have a line going through a word. Great for when you're funny creative with your writing!
  • Font Color...Drop down chart. High light the word or words and change the color.
  • High lighter...Drop down chart. High light the word and then high light with color! Lol
  • Link...high light the word or words that you want  to be linked some where else (another web site) High light the word or words and click on the word Link and then add the URL address of the link.
  • Picture...add a photo to your post
  • Video...add a video clip to your post
  • Jump Break...adds the "Read More" feature to your post. Gives the reader a little portion of the full article. Write your post. After the first few sentences (or where ever you want to end it) place the jump break in there. It will show on your post editor as "jump break", but in the actual post on your blog it will show the first few sentences and then say "READ MORE...". The your reader will have to click to finish reading your post.
  • Justify...drop down menu for Left, Center, Right and Full Justify. High light the section or put your cursor in front of the section you want justified.
  • Numbered List...this will number a list of the things for you 1, 2, 3 etc
  • Bullet List...this post is an example of a bullet list!
  • Block Quote...high light what you are going to be quoting. It just changes the placement of the phrase, like a block of words that is justified all by itself. See below, how it's separated from the rest of the post.
"To err is human...to forgive, divine". Alexander Pope
  • Remove Formatting...I think this is if you are copying and pasting something, high light and it will remove the formatting that already exist from say Microsoft Word or something and convert it to plain text for your post
  • Spell Checker...I use this EVERY time I write a post. When you are done with a post, bring the cursor up to the top of the post, click the ABC and it will high light all the incorrectly spelled words.

The only one I'm not sure of is the drop down box that says "Normal" between text size and the bold feature. It says Heading, Subheading, Minor Heading, Normal. I always feel "Normal", so I'll stick with that! I'm sure it's the set up of the post, but not sure. LOL

Hope this was helpful for all the new bloggers out there and even for us old timers too.

Have a great day,
~Karen~

Pin It
5:50 AM | 0 comments | Read More

Add A Favicon For Blogger...No HTML Code

Written By Unknown on Sunday, April 15, 2012 | 9:34 PM

Have you noticed the little tiny picture some websites and blogs have next to their web or URL address? It also shows up next to the website's name in your favorites or bookmarks. That cute little picture is called a Favicon...short for Favorite Icon. It is a 16x16px image...really tiny.

If you research those little cuties, it can be very complicated (HTML Codes). There are websites that will take your gif, jpg, png, and bmp image and transform it into an ico. What does all that mean...I don't know...too many big computer words for me. I'm still learning as I go, but my goal is easy.

Until I figure it out, here's the easiest way to have a favicon next to your address.

First, you need a clear, crisp image or vector. I like the image on a white background. You can use one of your own or there are a hundred sites that have images. Some images are free (you have to give credit though) and some you have to pay a small fee. Please read all the rules for the free images on each site. These are my favorite sites below.

Free Digital Photos

Dreamstime

123rf

Here's a quick tutorial on how to do it...

If you need an image, browse through the sites above. This one is easy and free with credit give to the photographer. Free Digital Photos...I have no affiliation with them just like the ease of use.


I found this red flower as an example...


In the picture below on the right, I have circled the size (400x400), where it's free and the credit that needs to be given.


After you have saved and down loaded your picture to your computer, you need to upload it to PicMonkey. Remember I did a post on PicMonkey a while back...it's my new Picnik since they are closing.


Once uploaded to PicMonkey, you need to either "Resize" or "Crop and Resize". For me this picture was 400x400 (square) and the image was in the center, so no need to crop.


For Blogger Favicons, the image has to be 100x100 or smaller. Click "Resize" and type in 100x100 then "Apply".  Now save this image to your computer. Type in a name so you'll know which one is the resized one...like Red Flower 100 or Red Flower 16

You might want to experiment with the size you make your photo. Maybe going right to the 16x16 image would work better for the picture you have. You won't know until you add it to your blog. (that's in the steps that follow)

Here's my 100x100 image. This image is from this source.


To add that little cutie to your blog, go to the "Design" page. Click the edit button next to the Favicon section (circled below).


Click the Browse button to find where you saved you Resized image.


Once you select the image, click the save button and you're done!! You can keep going back and removing the image and adding another size again until it looks right to you.


It may take a little time for the image to show up. Some browsers may not support this either, but it's cute next to your blog name in your blogger reading list.

Hope this is easier than reconfiguring an image and then getting an HTML code which you then have to go into expand your widget section. That whole section scares me, especially when they tell you to back up your blog first!! Not for me just for a tiny picture.

Have fun with it. I've changed mine several times already...it's a button now. We'll see how long that lasts!
~Karen~

Pin It
9:34 PM | 0 comments | Read More

Blog Buddy...The First Picture Means So Much

Written By Unknown on Friday, March 30, 2012 | 9:30 PM

If you're new to Sew Many Ways, I have a feature called Blog Buddy. Click HERE to read all of those posts. There you will find helpful tips and tricks for your blog.


I have one more tip to add to that list...

Pictures, photos or those captured moments in time.

The "first" picture actually.

Did you know the first picture you add to your blog post is the first picture that shows up on your reader's blog roll, their reading list, their google reader etc. The first picture you post is also that little picture on their blog side bar if you are on their blog list.

If you want to "grab" someone's attention to click on your blog post, in that first second they are scrolling through their list, that first picture can do it. All your pictures in that post might be great, but pick the one that best represents the post itself.

That is particularly important when doing a tutorial. I always start a tutorial post with a picture of the finished item. This helps because it not only shows up as the feature picture, but it's a visual draw for what the item is. It helps your readers see what to look forward to.

It's not crucial that you have a certain picture "first" in your post...it just a little extra touch that can help!!

Hope this Blog Buddy tip helps,
~Karen~


Pin It
9:30 PM | 0 comments | Read More

PicMonkey...My New Photo Editing Site

Written By Unknown on Sunday, March 18, 2012 | 9:40 PM

Pictures are important to everyone...not just blogging pictures, but the pictures we take of our family and friends. Photos are a permanent record of our lives, so making them extra special is a must.

In the past, to add that special touch to photos, I have always used the free photo editing service of Picnik. Unfortunately, Picnik is closing down in April. The site is still great and open for use by anyone...free of charge...even the premium services are free.

However, I've found an awesome new site that was started by 2 former Picnik engineers...


PicMonkey!!! This is the BEST photo editing site. I have no affiliation with them... just LOVE them and wanted to share. They're funny too!

The site is...

  • user friendly
  • has so many features
  • and it's FREE...yay!

The categories are...
  • Basic...crop, rotate, resize etc
  • Effects...so many!!
  • Touch Ups...wrinkle remover etc (Yay!!)
  • Text...add words
  • Overlays...add  shapes
  • Borders...add frames, rounded corners etc
You must pop over to give them a try...CLICK HERE for a visit. You won't be disappointed.

Have a happy Monday,
~Karen~

Pin It
9:40 PM | 0 comments | Read More